|
|||
 |
Preparations / Vorbereitungen | ||
| POV-Ray 3.6 (& optional
Mega-POV 1.x) must be installed on the System. These Settings can be applied automatically by the included WinRobots-File "pov-settings.exe". |
|||
POV-Ray 3.6 (& optional Mega-POV
1.x) müssen bereits auf dem System installiert sein. Diese Einstellungen nimmt die WinRobots-Datei "pov-settings.exe" auf Wunsch automatisch für Sie vor. |
|||
 |
Step 1 / Schritt 1 |
||
| Download SMPOV-File.. |
|||
| Laden Sie SMPOV herunter. | |||
 |
Step 2 / Schritt 2 |
||
| Exctract SMPOV-Files from the archiv. | |||
| Extrahieren Sie die SMPOV-Dateien aus dem Archiv. | |||
 |
Step 3 / Schritt 3 | ||
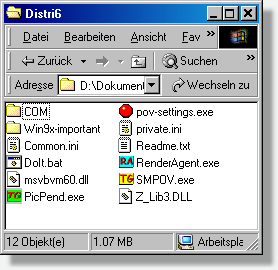
| Copy the whole Folder with
SMPOV-Files to any directory of your choice. e.g.C:\Distri6".
Be sure the directory in which you choose to copy the SMPOV files
is sharable. For Windows XP Pro, the directory C:\Program Files
is NOT SHARABLE and should not be used. |
|||
| Kopieren Sie den gesamten SMPOV-Ordner mit allen Dateien in eine Verzeichnis Ihrer Wahl. "C:\Programme\Distri6" zum Beispiel. | |||
 |
Step 4 / Schritt 4 | ||
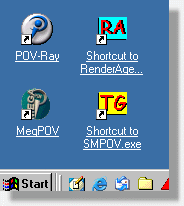
Make shortcuts on your desktop from:
|
|||
Erstellen Sie Verknüpfungen auf Ihrem Desktop zu den folgenden Dateien:
|
|||
 |
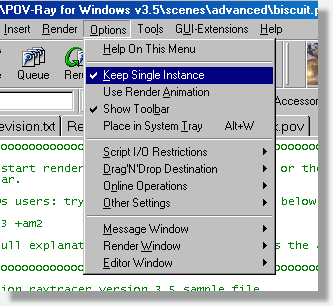
Step 5 / Schritt 5 | ||
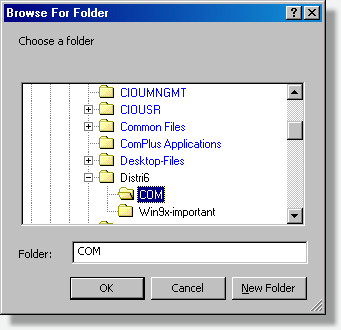
Start
"RenderAgent.exe" with a doubleclick on its Icon. The
"Browse for Folder" dialog will appear. Browse over
your network to the COM directory of he folder you used in Step
3 on the computer on which you will run SMPOV. All RenderAgent
clients must point to a common COM directory on the master-pc
(SMPOV) for distributed rendering to work.
Please read the additional information
about the COM-Folder at the end of this document. |
|||
| Starten Sie das Programm "RenderAgent.exe" mit einem Doppelklick auf dessen Verknüpfung auf dem Desktop. Es erscheint nebenstehend abgebildeter "Browse for Folder" Dialog. Wählen Sie den COM-Ordner, der sich im Distributions-Verzeichnis befindet. Bitte beachten Sie die zusätzlichen Hinweise zum COM-Ordner unten. | |||
 |
Step 6 / Schritt 6 | ||
| On the right side of RenderAgent you'll find checkmarks for "Slot 1" to "Slot 4". Mark one Checkmark for each CPU in your PC. Leave other settings for now unchanged. | |||
| Auf der rechten Seite des "RenderAgent" finden Sie Kontrollkästchen für "Slot 1" bis "Slot 4". Aktivieren Sie jeweils eines davon für jede CPU in Ihrem PC. | |||
 |
Step 7 / Schritt 7 | ||
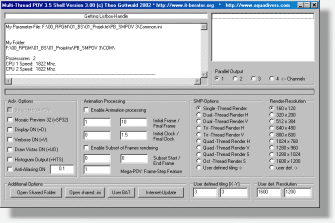
| Start SMPOV.exe with a doubleclick on its shortcut. It will appear like in the picture on the left side. | |||
| Starten Sie SMPOV.exe mit einem Klick auf die Verknüpfung auf Ihrem Desktop. SMPOV erscheint etwa so wie in dem Bild links. | |||
 |
Step 8 / Schritt 8 | ||
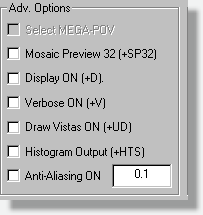
| Choose the desired options in the field "Adv. Options". These Options are normal POV-Ray Options. For more informations read the POV-Ray Manuals. | |||
| Wählen Sie die gewünschten Optionen im Feld "Adv. Options". Diese Optionen sind POV-Ray Optionen (Command-Line Options). Sie finden nähere Erläuterungen zu diesen Optionen in den POV-Ray Manuals. | |||
 |
Step 9 / Schritt 9 | ||
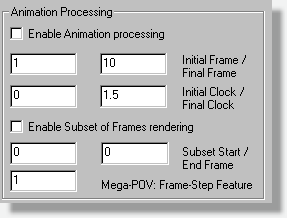
| These are the Settings for "Animation Processing". They are also explained in the POV-Ray / Mega-POV Manuals. We do not want to render an Animation right now. Therefore we leave that all as it is. | |||
| Das sind die "Animation Processing"-Einstellungen. Auch diese Einstellungen sind in den POV-Ray / Mega-POV Manuals detailliert erläutert. Da wir hier keine Animation berechnen wollen, lassen wir alles, wie es ist. | |||
 |
Step 10 / Schritt 10 | ||
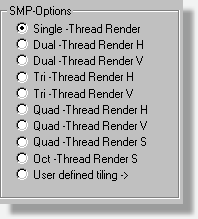
| SMPOV can split the whole picture in small "Tiles". In this Field you can decide whether you want that or not. We will choose "Dual-Thread Render H". SMPOV will split the picture "H"orizontally in two pieces and make "two renderjobs" for the RenderAgents. | |||
| SMPOV kann das Bild in kleine Teile aufteilen, die gleichzeitig berechnet werden. In diesem Feld können Sie entscheiden, ob sie das tun möchten. Ebenso stellen Sie hier ein, wie das Bild aufgeteilt werden soll. Wir wählen "Dual-Thread Render H", was bedeutet, dass SMPOV das Gesamtbild "H"orizontal in zwei Teile aufteilt und diese zwei "Render-Jobs" gleichzeitig den "RenderAgents" zur Verfügung stellt. | |||
 |
Step 11 / Schritt 11 | ||
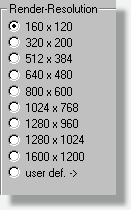
| Choose the desired Output-Resolution for the picture. | |||
| Wählen Sie die Gewünschte Auflösung für das zu berechnende Bild. | |||
 |
 |
Step 12 / Schritt 12 | |
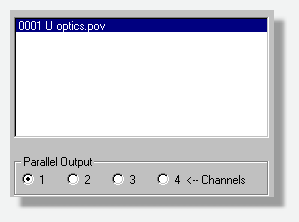
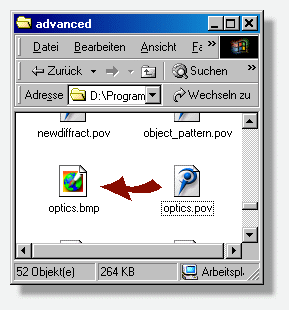
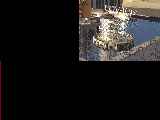
| Now lets do a Test-Rendering. Go to your POV-Ray Directory and look at: "POV-Ray for Windows v3.5\scenes\advanced". You should see a file called "optics.pov" which need quite a while to compute. "Drag and drop" this file into the SMPOV-Window (File-Que). In the picture left you see the SMPOV-"File-Que". Wait till the "File-Que" is empty again. | |||
| Nun ist alles vorbereitet. Wir wollen nun eine Datei rendern. Gehen Sie in das Verzeichnis: " "POV-Ray for Windows v3.5\scenes\advanced"" und suchen Sie die Datei "optics.pov". Ziehen Sie die Datei in das SMPOV-Fenster (Datei-Warteschlange) und lassen Sie die Datei dort fallen. Das Bild links zeigt die SPMOV-"Datei Warteschlange". Warten Sie, bis die "Datei-Warteschlange" leer ist. | |||
 |
Ready / Fertig | ||
| Now lets take a look at the results. SMPOV copies the picture automatically where the Source-POV-File came from. So we should find it in "POV-Ray for Windows v3.5\scenes\advanced" with the same name as the source-file and the endig ".bmp". Please note that any file that may have been there before is deleted. | |||
| Nun lassen Sie uns das Ergebnis ansehen. SMPOV kopiert das Ergebnis in das Verzeichnis, von wo es die Quell-Datei erhalten hat. Dies ist hier: "POV-Ray for Windows v3.5\scenes\advanced". Die Datei wird also "optics.bmp" heissen. | |||
 |
Open Shared Folder-Button / Open Shared Folder-Taste | ||
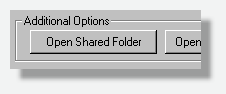
| I have done some test-rendering to find out if we really save time when tiling the picture. Please note that if you press the Button "Open Shared Folder" after the process, you will find a text-file called "Times-Log.txt" that shows the Details on rendering, used time etc. Below some results. | |||
| Ich habe ein paar Tests gemacht, um festzustellen, ob wir wirklich Zeit sparen, wenn wir die Bilder "gestückelt" berechnen. Wenn Sie nach dem Vorgang die Taste "Open Shared Folder" drücken, finden Sie dort eine Textdatei "Times-Log.txt". Sie enthält die Zeitmessungen der letzten Vorgänge. Im Folgenden ein Auszug. Die Zahl in Klammern am Ende gibt die Zeit in Sekunden an.. | |||
|
PicPend-1.exe make one big picture out of the many small tiles / PicPend-1.exe setzt die Stücke zusammen. |
||
See, how the picture look, which are produced by POV-Ray 3.6 before PicPender "appends" them to the final result. |
|||
Im Bild links kann man sehen, dass POV-Ray 3.4 beim rendern von Bildauschnitten mitunter sehr viel schwarzen Rand produziert. PicPend-1.exe wurde speziel für das Zusammenfügen von POV-Ray Bildern entwickelt. Deshalb ist PicPend-1.exe leider nicht geeignet andere Bilder zusammenzusetzen, denn wie man sieht produziert POV-Ray systembedingt eine ganze Menge schwarze Flächen um den eigentlich erforderlichen Bildausschnitt. Vermutlich wird bei Rendern eines Bildausschnittes einfach geprüft ob der aktuell zu berechnende Pixel in dem besagten Ausschnitt liegt. Falls das nicht der Fall ist, wird eben ein schwarzer Punkt in die BMP-Datei geschrieben. |
|||
 |
|
Time-Measurement / Zeitmessung: Times-Log.txt | |
optics.pov rendered in 320x200
in 2 Tiles (H) from 07-09-2003 / 07:29:00 to 07-09-2003 / 07:31:20
(141). |
|||
Erläuterung: Auch die 3 und 8 "tiles" wurden hier mit nur 2 CPU's gerendert. Test-PC ausgestattet mit Dual Athlon 2000. Das Gerät wurde benutzt während des Tests, die Werte sind daher nur Richtwerte. |
|||
|
Some Explanations about
the COM-Folder Einige Erläuterungen zum COM-Ordner |
||
|
As could be seen above, there is a "COM" or Communications-Folder through which the Components of the System (SMPOV.exe and RenderAgent.exe) communicate with each other. "RenderAgent.exe" writes the place where this folder is located at the first start into the file: "R-private.ini". "SMPOV.exe" writes the location into the file "private.ini". Both files must be in the same folder where the "exe-file" itself is. Should there be a reason then its possible to change/check the contents of the file with a text-editor. In cases, where other PCs over the network are taking part in the rendering, the COM-Folder must be a shared folder. And of course the RenderAgent on that network-pc must have a valid "R-private.ini"-file. NEW. From Distri11, the additional Files need to be in the COM\INI-Folder. For Speed reasons, the COM-Folder has been subdivided in three Subfolders: INI, BMP and JOB. |
|||
Wie oben zu sehen war,
gibt es einen "COM" oder Kommunikationsordner, mittels
dem die Systemkomponenten SMPOV.exe und RenderAgent.exe kommunizieren.
"RenderAgent.exe" schreibt den Platz, wo dieser Ordner
zu finden ist, in die Datei "R-private.ini". "SMPOV.exe"
schreibt den Pfad in die Datei "private.ini". Beide
Dateien müssen im gleichen Ordner sein wie die jeweilige
"exe-Datei" selbst. Sollte der COM-Ordner verlegt werden
müssen, so kann auch manuell der Eintrag in der Datei geprüft/geändert
werden. In Fällen, wo Netzwerk-PC's an den Berechnungsvorgängen
beteiligt sind, muss der COM-Ordner ein freigegebener Ordner und
von dem Netzwerk-PC aus erreichbar sein. Und natürlich muss
der Pfad in der "R-private.ini"-Datei auf dem Netzwerk-PC
stimmen. NEU: Ab Distri11, enthält der COM-Ordner drei Unterordner: BMP, JOB und INI. Der "INI"-ordner muss fortan die zum Rendern der jeweiligen ".pov"-Datei eventuell erforderlichen zusätzlichen Dateien (".inc", Bilder, Daten etc.) enthalten. |
|||

Hits | Theo Gottwald * Wolfartsweierer Str.1 * 76131 Karlsruhe | Telefon (07 21) 9 66 33-00 | Fax (07 21) 9 66 33-99 |Info@it-berater.org | Stand: 04/29/2006